from the Homeschool Teachers Resource Index


You might begin your project with a visit to the local lumber yard or wood craft store. Honduran Rosewood is by far the most favored choice for bar fabrication although other hardwoods such as cardinal wood or purpleheart hardwood will provide suitable, less expensive alternatives for this first project. Gather together a collection of scrap hardwoods and tap on them to evaluate their initial tone. Listen for brightness or darkness of tone, how fast the hardwood responds, and most importantly its ability to sustain a tone.
The bar dimensions provided here are for building a xylophone with a range extending from C4-A5. All bars should be cut 1 3/16" wide by 5/8" thick. Bar lengths are as follows:
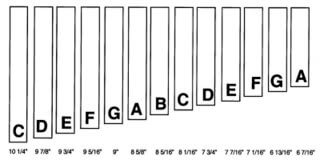
C: 10 1/4" D: 9 7/8" E: 9 3/4" F: 9 5/16" G: 9" A: 8 5/8" B: 8 5/16" C: 8 1/16" D: 7 3/4" E: 7 7/16" F: 7 1/16" G: 6 13/16 A: 6 716"
After all the blanks are cut to size, choose a medium grit sandpaper to take off the sharp edges and corners.
The nodal point for the fundamental pitch is the point at which the bar should be drilled for a positioning rod. The nodal point is 22.4% from the end of the bar before it is undercut. With the undercut made, it is in a sense lengthened. Therefore, an accurate placement of the drilled hole will need to be a little closer to the end of the bar.
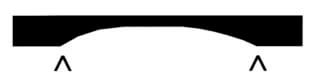
With the fundamental nodal points calculated and the hole for the positioning post drilled, the arch can now be cut. Begin by sketching the arch on the side of each bar with the ends of the arch ending slightly before the nodal points at each end of the bar. Xylophone bars have a shallow arch. The illustration below should serve as a model for shaping the arch of each bar effectively.

The initial shaping of the underside of the bar can be managed with a bandsaw. The rest of the undercut shaping is best left to a power sander. Keep in mind as you are fine tuning the bar that the fundamental pitch is most affected by removing wood in the middle of the arch. If in fine tuning the fundamental pitch you remove too much wood, which drops the pitch past the desired frequency, simply sand a little off both ends of the bar (see example below). This procedure will keep the bar balanced and able to respond with a consistent vibration throughout the bar. It is the interaction of the two ends and the flexibility of the center of the bar that produces the fundamental pitch. Work carefully and the pitch will return to the desired frequency.

When fine tuning the upper harmonics, sanding at the ends of the arch is required. Fine tuning of harmonics will be a challenge at first but will be a worthwhile pursuit. While it is not necessary to tune the harmonics to produce a bar of adequate quality for a father/son project, the actions and reactions within a properly tuned bar will work together, rather than in opposition, for an end product that is resonant and pleasing.
For this project the tuning of the octave above the fundamental should serve as a sufficient goal. After the fundamental has been tuned, attention may be turned to tuning the overtone. To find the overtone, turn your xylophone mallet around and tap the bar with the handle while holding the bar at its nodal point. The octave may have to be tuned by ear if it does not register on the tuner. Sanding at both ends of the arch will bring the pitch down. Make sure to be mindful of the fundamental pitch, as it too may be affected by the sanding process.
A light coat of lacquer will give your bars a finished look.
Hardwood, Pine or Plywood
Elmers Yellow Wood Glue
13 - 2" Slotted Brass Round Head Bolts
14 - 1 1/4' Allen Set Screws
14 - Black Plastic Screw Covers
2' - Black Rubber Vacuum Tubing
12' - Soft Cotton Cord
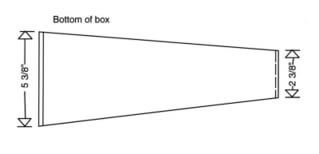
The xylophone box may be manufactured from hardwood, pine or plywood. If you choose to work with plywood, search for a lumberyard in your area that sells 5 or 7 ply furniture grade plywood with a thin laminate on both sides. The laminate will enhance the look of your finished project. If you decide on plywood it will also be necessary to modify the measurements of the plans, as the plywood will not be milled to thickness specifications. Begin by cutting the two sides with the dimensions below:
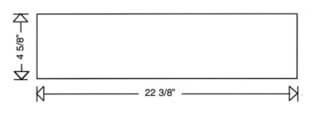
Follow with the measuring and cutting of the two end pieces:
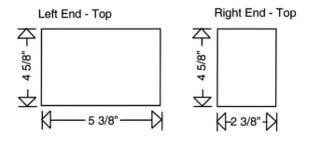
These two pieces should be machined with the ends of both end pieces angled 3 degrees. This will allow for a snug fit of the box's sides as the box tapers from the large end to the small end.

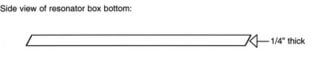
Measure and cut the bottom of the resonator box next.
Side view of the resonator box bottom:
Side view of resonator box for box bottom positioning:

Resonator box dividers may be cut next. Two dividers 1/8' in thickness should be sufficient for this project.

Finally, cut the handles for the resonator box. They may be simple as shown or you may decide to be creative.
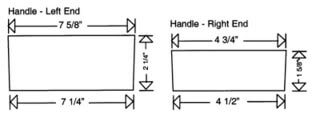
Handle - Left End 7 5/8" x 7 1/4" x 2 1/4" Handle - Right End 4 3/4" x 4 1/2" x 1 5/8"
With the pieces cut the resonator box is ready for assembly. Begin by gathering the four sides and clamping them together. Next, slide the box bottom into place tapping it down until the angle and depth are correct. The position of the resonator box bottom is critical to the overall performance of your instrument. If the distance of the bottom of the box is not set correctly, amplification will be limited and unwanted harmonics will result. Next, slide the dividers into place. If all the pieces fit snugly, you are ready to glue. If any gaps are found, it would be best to adjust the problem as they will restrict the resonation of the sound.

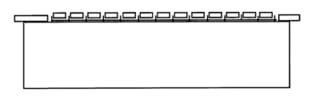
When the glue has dried sufficiently and the clamps are removed, you may begin the installation of the bar posts. Space the bars evenly, using dividers as a guide, and mark the position for each post with an awl. Remove the bars and drill the holes to 3/4" depth. Cut a 1 1/4" piece of vacuum tubing and thread the bolt through it. The vacuum tubing will provide a bumper that will limit extraneous noise when the bar is played.

Fourteen guide posts will be needed to keep the bars in alignment. Set screws with plastic screw covers will work well.

After the bar posts and bar guides are installed, braid weave the cord around the posts on both sides. The cord will provide a cushion for the bars.

The bars may now be placed on the xylophone and the instrument can be tested.
Congratulations on completing your Orff xylophone!

Instant unlimited access to 650+ premium piano & instrumental sheet music arrangements, theory worksheets and games, composer resources, and lesson plans. New resources added every month. Cancel anytime. Start $36 Unlimited Access

Andy Fling founded MakingMusicFun.net in 2007. With 14 years in the classroom and 19 years creating resources for elementary music education, he is guided by the belief that kids learn best when they're having fun. He is also a big believer in "unplugged" learning and personal connections. Instead of screens and "streaks," his resources focus on teacher-led lessons, real progress, and a lifelong appreciation for music. Read More »


